Kia Niro: Blower / Intake Actuator Repair procedures
| Inspection |
| 1. |
Switch "OFF" the ignition. |
| 2. |
Disconnect the intake actuator connector. |
| 3. |
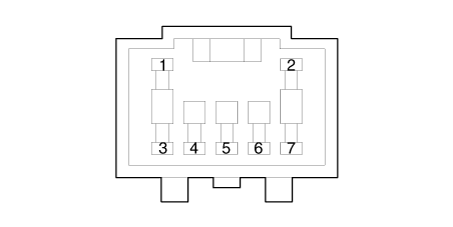
Verify that the intake actuator operates to the fresh position when connecting 12V to terminal 3 and grounding terminal 4. Verify that the intake actuator operates to the recirculation position when connected in reverse.
|
| 4. |
Connect the intake actuator connector. |
| 5. |
Switch "ON" the ignition. |
| 6. |
Check the voltage between terminals 5 and 6. Specification
It will feedback the current position of the actuator to controls. |
| 7. |
If the intake actuator does not operate well, substitute with a known-good intake actuator and check for proper operation. |
| 8. |
Replace the intake actuator if it is proved that there is a problem with it. |
| Replacement |
| 1. |
Disconnect the negative (-) battery terminal. |
| 2. |
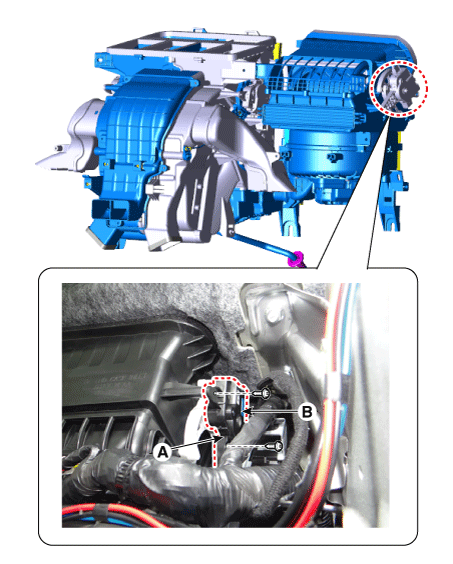
Remove the main crash pad assembly. (Refet to Body - "Main Crash Pad Assembly") |
| 3. |
Disconnect the connector (A) and then remove the intake actuator (B) after loosening the screws.
|
| 4. |
Install in the reverse order of removal. |
 Intake Actuator Description and operation
Description
Located in the blower unit, the intake actuator regulates the intake door based
on the signal from the control unit. Pressing the intake selection switch will shift
betwee ...

Other information:
Kia Niro 2017 (DE HEV) Service Manual: Inside Rear View Mirror Repair procedures
Replacement
Put on gloves to protect your hands.
•
Use a plastic panel removal tool to remove interior trim pie ...
Kia Niro 2017 (DE HEV) Service Manual: Mode Control Actuator Repair procedures
Inspection
1.
Switch "OFF" the ignition.
2.
Disconnect the mode control actuator connector.
3.
Verify that the mode control actuator operates to the defrost mode when
connecting 12V to terminal 3 and ground ...
