Kia Niro: Audio / Audio Unit Repair procedures
| Removal |
|
| 1. |
Disconnect the negative (-) battery terminal. |
| 2. |
Remove the center fascia upper panal. (Refer to Body - "Center Fascia Panel") |
| 3. |
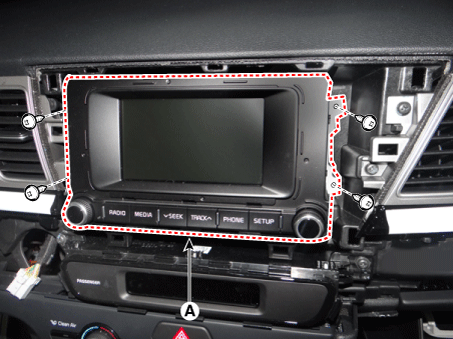
Remove the audio head unit (A) after loosening the screws.
|
| 4. |
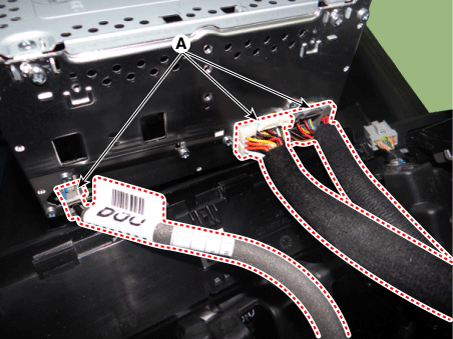
Remove the audio head unit after disconnecting the connectors and antenna cable (A).
|
| Installation |
| 1. |
Connect the audio unit connectors and antenna cable. |
| 2. |
Install the audio head unit. |
| 3. |
Install the center fascia upper panel. |
| 4. |
Connect the negative (-) battery terminal.
|
 Audio Unit Components and components location
Components
[RADIO/CD/MP3]
Connector Pin Information
No.
Connector A
Connector B
1
Rear left speaker (+ ...
 Speakers Repair procedures
Inspection
Troubleshooting of the speakers
When handling the speakers :
•
D ...
Other information:
Kia Niro (DE HEV) Owners Manual: TPMS (Tire Pressure Monitoring System) malfunction indicator
The TPMS malfunction indicator will illuminate after it blinks for approximately
one minute when there is a problem with the Tire Pressure Monitoring System.
We recommend that the system be checked by an authorized Kia dealer to determine
the cause of the problem.
✽ NOTICE
If there is a m ...
Kia Niro (DE HEV) Owners Manual: Use high quality ethylene glycol coolant
Your vehicle is delivered with high quality ethylene glycol coolant in the cooling
system. It is the only type of coolant that should be used because it helps prevent
corrosion in the cooling system, lubricates the water pump and prevents freezing.
Be sure to replace or replenish your coolant ...


