Kia Niro: Windshield Glass / Repair procedures
| Removal |
Put on gloves to protect your hands. |

Use seat covers to avoid damaging any surfaces. |

| 1. |
Remove the roof side molding. (Refer to Body Side Moldings - "Roof Side Molding") |
| 2. |
Remove the front pillar trim. (Refer to Interior Trim - "Front Pillar Trim") |
| 3. |
Remove the inside rear view mirror assembly. (Refer to Mirror - "Inside Rear View Mirror") |
| 4. |
Remove the cowl top cover. (Refer to "Cowl Top Cover") |
| 5. |
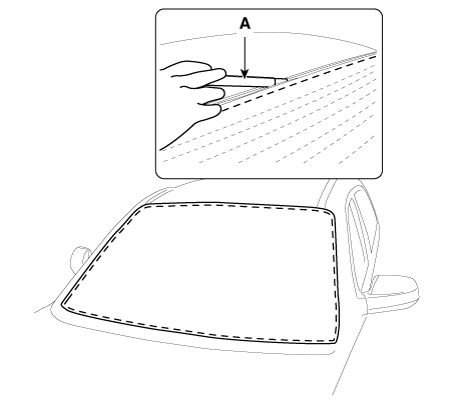
Cut out the adhesive using a cutter (A).
|

| 6. |
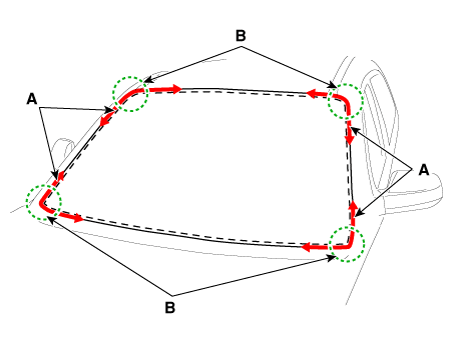
Cut off the sealant on the edge (B) while pulling the piano wire (A) left and right.
|
| 7. |
If the piano wire (A) is visible outside the chassis, push it back into the chassis.
|

| 8. |
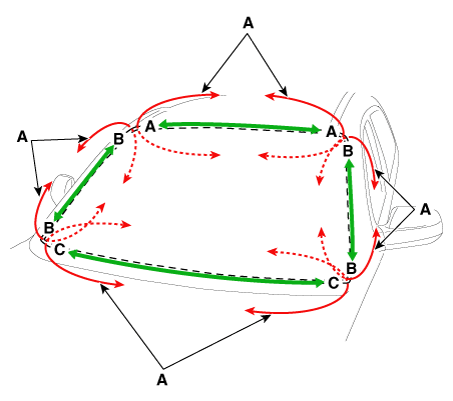
Cut off the sealant on (A-A), (B-B), (C-C), while pulling a piano wire (A) left and right.
|
| 9. |
Carefully lift up the windshield glass (B) by using a glass holder (A).
|

| Installation |
| 1. |
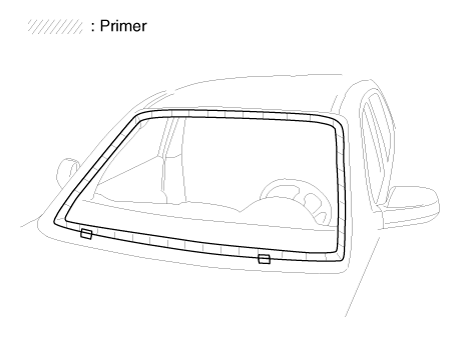
With a knife, smoothly scrape off the old adhesive to a thickness of about 2 mm (0.0079 in.) on the bonding surface around the entire windshield opening flange:
|
| 2. |
Clean the bonding surface with a sponge dampened in alcohol. After cleaning, keep the surface clean from oil, grease and water. |
| 3. |
With a sponge, apply a light coat of body primer to the original adhesive remaining around the windshield opening flange. Let the body primer dry for at least 10 minutes.
|
| 4. |
Apply a light coat of glass primer to the outside of the fasteners.
|
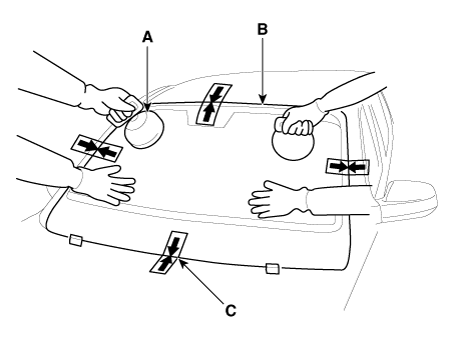
| 5. |
Pack adhesive into the cartridge without air pockets to ensure continuous delivery. Load the cartridge in a caulking gun, and run a bead of adhesive (B) around the edge of the windshield glass (A) between the fastener and molding as shown. Apply the adhesive within 30 minutes after applying the glass primer. Make a slightly thicker bead in each corner.
|

| 6. |
Use suction cups (A) to hold the windshield glass (B) over the opening, align it with the alignment marks (C), and set it down on the adhesive. Lightly push on the windshield until its edges are fully seated on the adhesive all the way around. Do not open or close the doors until the adhesive is dry.
|
| 7. |
Install the cowl top cover. (Refer to "Cowl Top Cover") |
| 8. |
Let the adhesive dry for at least one hour, then spray water over the roof and check for leaks. If a leak occurs, let it dry, then seal with sealant :
|
| 9. |
Install the inside rear view mirror assembly. (Refer to Mirror - "Inside Rear View Mirror") |
| 10. |
Install the front pillar trim. (Refer to Interior Trim - "Front Pillar Trim") |
| 11. |
Install the roof side molding. (Refer to Body Side Moldings - "Roof Side Molding") |
 Components and components location
Components
1. Windshield glass
...

Other information:
Kia Niro 2017 (DE HEV) Service Manual: Cooling Fan Components and components location
Components
1. Cooling fan
2. Cooling fan motor
3. Cooling fan shroud
4. Air dam
5. Cooling fan controller (PWM)
...
Kia Niro 2017 (DE HEV) Service Manual: General information
Towing
If the vehicle needs to be towed, call a professional towing service. Never tow
vehicle with just a rope or chain. It is very dangerous.
[Front]
[Rear]
Emergency Towing
There are three popular methods of towing a vehicle :
–
The operator loads ...
