Kia Niro: Assist Emergency Braking(AEB) System / Repair procedures
| Inspection |
AEB function ON / OFF switch was included to USM (User Setting Menu) and the state of the factory is ON.
When the IGN On, maintain ON condition by default. And does not reflect the driver settings when next IGN On.
If turned the ESP function Off, the AEB function is turned off.
| – |
The ON/OFF for AEB is included in the USM (User Setting Menu) and the default is ON. |
| – |
While IGN is On, it stays at ON, however, the driver's settings do not last next time when IGN is newly On. |
| – |
When ESP is Off, AEB is also turned Off. |
| Removal |
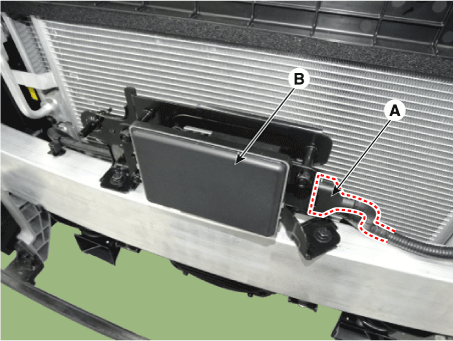
AEB radar
| 1. |
Turn ignition switch OFF and disconnect the negative (-) battery terminal. |
| 2. |
Remove the front bumper cover. (Refer to Body - "front bumper") |
| 3. |
Disconnect the smart cuse control unit connector (A). |
| 4. |
Remove the AEB radar (B).
|
LDWS camera
AEB, contrary to SCC (Smart Cruise Control) has to work on a stationary car so the system uses the Fusion Target system to combine radar and camera.
| 1. |
Disconnect the battery (-) cable. |
| 2. |
Perform Service Point Target Auto Calibration (SPTAC). (Refer to Body Electrical System - "Lane Departure Warning System (LDWS)") |
| Installation |
AEB radar
| 1. |
Installation is the reverse of removal. |
| 2. |
Perform AEB radar sensor alignment. (Refer to Engine Electrical System - "Smart Cruise Control System") |
LDWS camera
| 1. |
Installation is the reverse of removal. |
| 2. |
Perform Service Point Target Auto Calibration (SPTAC). (Refer to Body Electrical System - "Lane Departure Warning System (LDWS)") |
 Schematic diagrams
Schematic diagram
Terminal Function
NO.
Terminal function
1
B+
2
NC
...

Other information:
Kia Niro 2017 (DE HEV) Service Manual: Description and operation
Description
TREAD Lamp
–
Tire Under Inflation / Leak Warning.
1.
Turn on condition
•
When tire pressure is below allowed threshold
•
When rapid leak is detected b ...
Kia Niro 2017 (DE HEV) Service Manual: Fuel Pressure Sensor (FPS) Specifications
Specification
Pressure [kPa (kgf/cm², psi)]
Output Voltage (V) [Vref = 5V]
50 (0.51, 7.3)
0.3
600 (6.12, 87.0)
2.5
1100 (11.2, 159.5)
4.5
...
