Kia Niro: High Voltage Battery System / Power Relay Assembly (PRA) Repair procedures
| Removal |
|

| 1. |
Shut off the high voltage circuit. (Refer to Hybrid Control System - “High Voltage Shutoff Procedure”) |
| 2. |
Remove the rear seat cushion. (Refer to Body - "Rear Seat Assembly") |
| 3. |
Remove the rear door scuff trim. (Refer to Body - "Door Scuff Trim") |
| 4. |
Remove the cooling duct. (Refer to High Voltage Battery Cooling System - "Cooling Duct") |
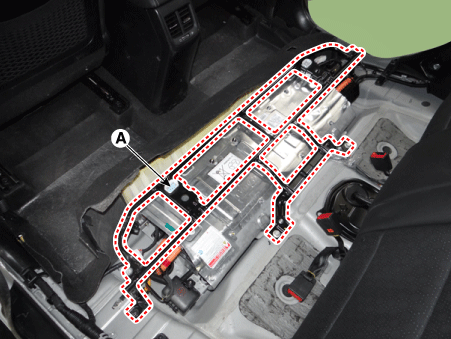
| 5. |
Remove the upper frame (A) after loosening the mounting bolts and nuts.
|
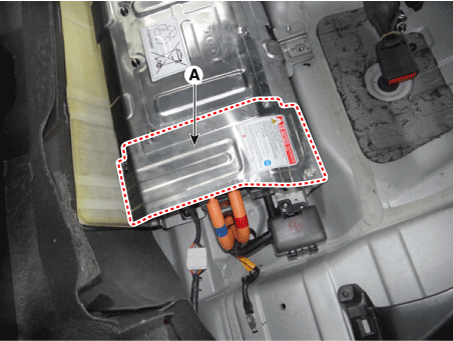
| 6. |
Remove the high voltage battery rear cover (A) after loosening the mounting bolts and nuts.
|
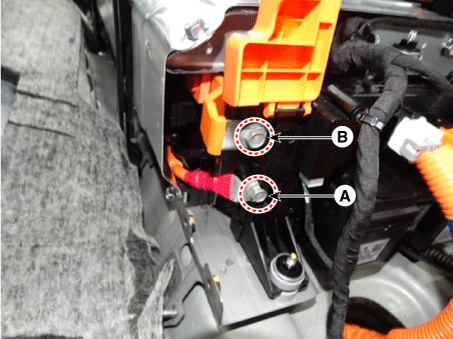
| 7. |
Disconnect the high voltage power cable [+] (A) and high voltage cable [-] (B) after loosening the mounting bolts.
|
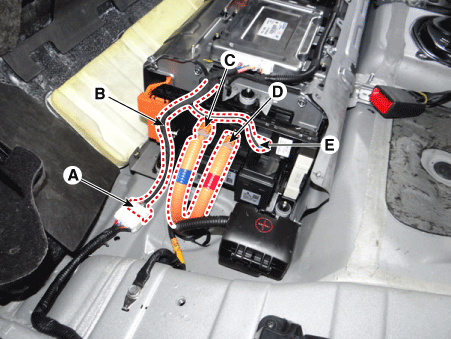
| 8. |
Disconnect the BMS ECU extension connector (A), battery current sensor connector (B), inverter power connector [-] (C), inverter power connector [+] (D) and , PRA connector (E).
|
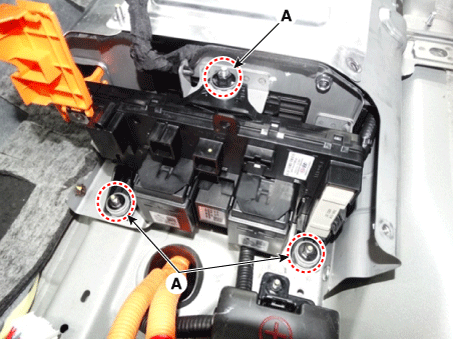
| 9. |
Remove the power relay connector after loosening the mounting nuts (A).
|
| Installation |
|
| 1. |
Install the power relay assembly in the reverse order of removal. |
 Power Relay Assembly (PRA) Description and operation
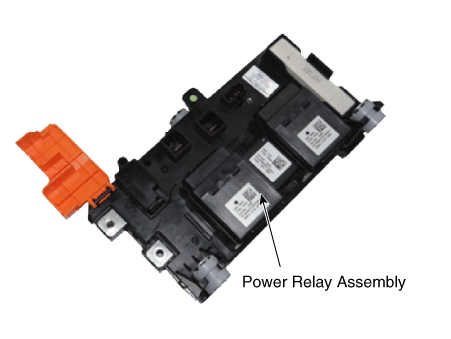
Description
The Power Relay Assembly (PRA) consists of the positive and negative main relays,
pre-charge relay, pre-charge resistor and battery current sensor. It is located
inside th ...

Other information:
Kia Niro 2017 (DE HEV) Service Manual: SRS Control Module (SRSCM) Description and operation
Description
The primary purpose of the SRSCM (Supplemental Restraints System Control Module)
is to determine between an event that warrants restraint system deployment and an
event that does not. The SRSCM must decide whether to deploy the restraint system
or not. After determinin ...
Kia Niro 2017 (DE HEV) Service Manual: Special service tools
Special Service Tools
Tool Name / Number
Illustration
Description
RKE Battery Checker
09954-2P100
Measuring the RKE battery voltage
Calibration jig for LDWS or LKAS
09890-3V100
...
