Kia Niro: Power Door Locks / Power Door Lock Module Repair procedures
| Inspection |
|

Front Door Lock Module Inspection
| 1. |
Remove the front door trim. (Refer to Body - "Front Door Trim") |
| 2. |
Remove the front door module. (Refer to Body - "Front Door Module") |
| 3. |
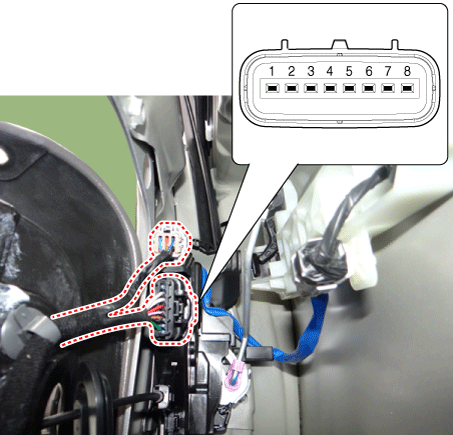
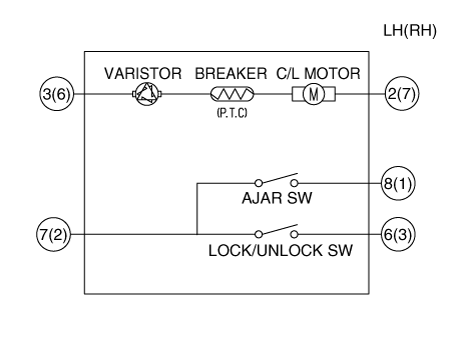
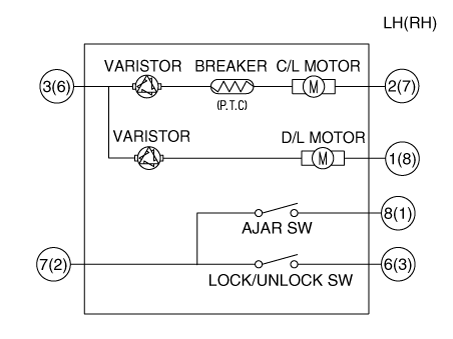
Disconnect the connector from the actuator.
[Central Lock Motor]
[Dead Lock Motor]
|
||||||||||||||||||||||||||||||||||||||||||||||||||||||||||
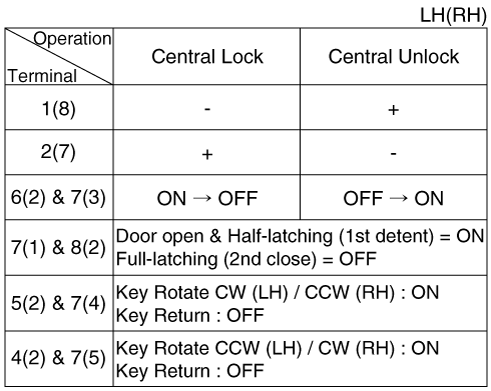
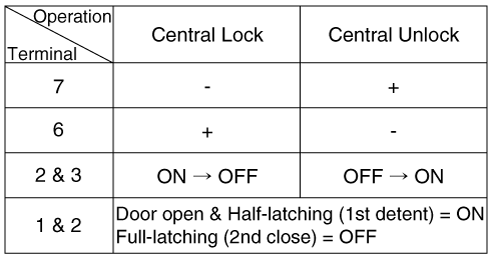
| 4. |
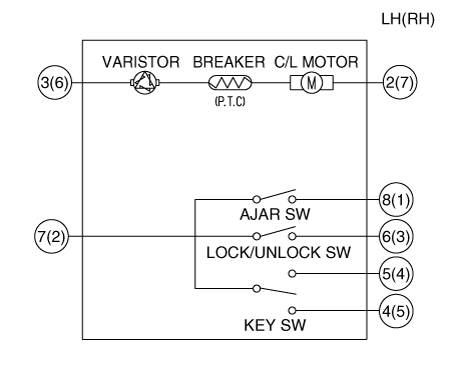
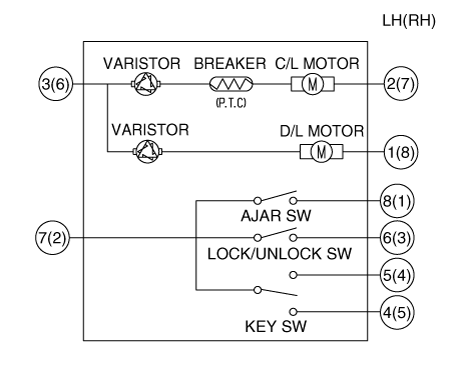
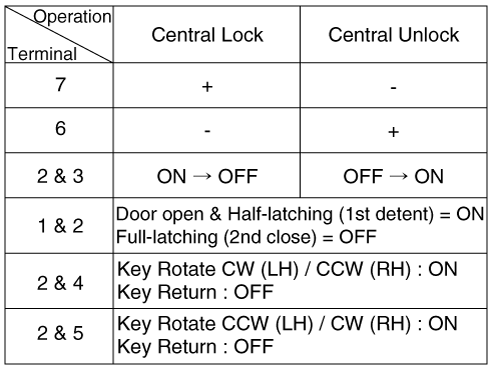
Check actuator operation by connecting power and ground as shown below. To prevent damage to the actuator, apply battery voltage only momentarily. [Central Lock Motor]
[Dead Lock Motor]
[Central Lock Motor] (LH)
(RH)
[Dead Lock Motor]
|

Rear Door Lock Module Inspection
| 1. |
Remove the rear door trim. (Refer to Body - "Rear Door Trim") |
| 2. |
Remove the rear door module. (Refer to Body - "Rear Door Module") |
| 3. |
Disconnect the connector from the actuator.
[Central Lock Motor]
[Dead Lock Motor]
|
||||||||||||||||||||||||||||||||||||||||||||||||||||||||||

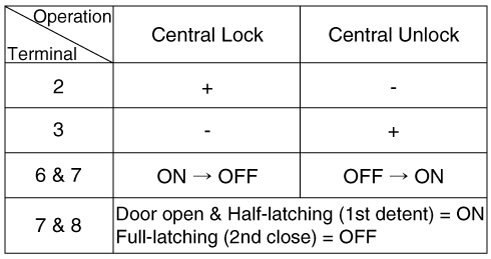
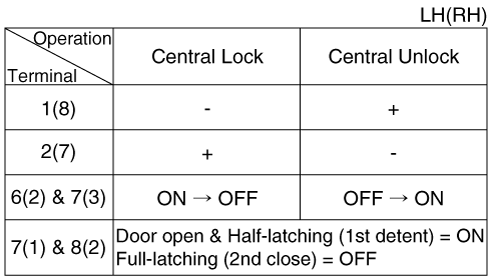
| 4. |
Check actuator operation by connecting power and ground as shown below. To prevent damage to the actuator, apply battery voltage only momentarily. [Central Lock Motor]
[Dead Lock Motor]
[Central Lock Motor] (LH)
(RH)
[Dead Lock Motor]
|
Tailgate Lock Module Inspection
| 1. |
Remove the tailgate trim. (Refer to Body - "Tailgate Trim") |
| 2. |
Disconnect the connectors from the actuator.
|

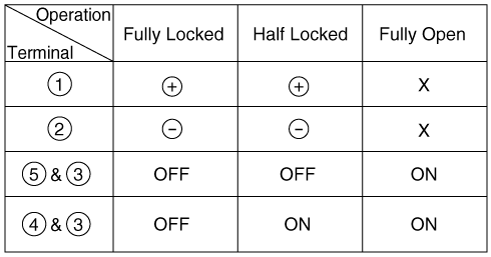
| 3. |
Check actuator operation by connecting power and ground as shown below. To prevent damage to the actuator, apply battery voltage only momentarily.
|

| 4. |
Checking the tailgate of the vehicle power option power refers to the tailgate module. |
 Power Door Lock Module Components and components location
Components
1. Door lock/unlock knob cable
2. Door inside handle cable
3. Door latch assembly
...
 Power Door Lock Switch Repair procedures
Inspection
[Non-IMS Type]
1.
Check for continuity between the terminals. If there is an abnormality,
replace the switch.
...
Other information:
Kia Niro (DE HEV) Owners Manual: Radio
FM/AM (with RDS)
DAB
(1) Radio
Switch between FM, AM and DAB*.
* if equipped
(2) List
View all available stations.
(3) Presets
View all presets.
(4) Menu
Navigate to the menu screen.
Switching between FM, AM and DAB*
Press the [RADIO] button on the audio system to switch between F ...
Kia Niro 2017 (DE HEV) Service Manual: Fuel Pressure Control Valve (FPCV) Specifications
Specification
Item
Specification
Coil Resistance (Ω)
0.52 ± 5 % [20°C(68°F)]
Rated Voltage (V)
6 - 16
Pin
2
...
