Kia Niro: High Voltage Battery Cooling System / Cooling Duct Repair procedures
| Removal |
|

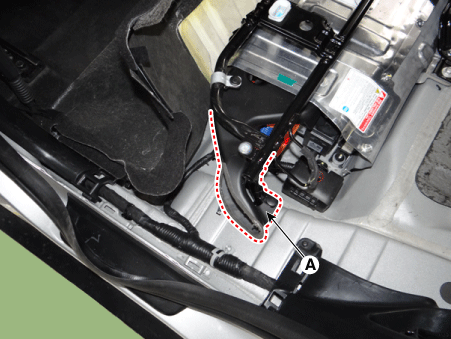
Cooling Duct (Inlet)
| 1. |
Shut off the high voltage circuit. (Refer to Hybrid Control System - “High Voltage Shutoff Procedure”) |
| 2. |
Remove the rear seat cushion. (Refer to Body - "Rear Seat Assembly") |
| 3. |
Remove the rear door scuff trim. (Refer to Body - "Door Scuff Trim") |
| 4. |
Remove the inlet cooling duct (A) after loosening the mounting fastener.
|
Cooling Duct (Outlet)
| 1. |
Shut off the high voltage circuit. (Refer to Hybrid Control System - “High Voltage Shutoff Procedure”) |
| 2. |
Remove the rear seat cushion. (Refer to Body - "Rear Seat Assembly") |
| 3. |
Remove the rear door scuff trim. (Refer to Body - "Door Scuff Trim") |
| 4. |
Remove the outlet cooling duct (A) after loosening the mounting nut.
|

| Installation |
|
| 1. |
Install the cooling ducts in the reverse order of removal. |
 Cooling Fan Repair procedures
Removal
•
Be sure to read and follow the “General Safety Information and
Caution” ...

Other information:
Kia Niro 2017 (DE HEV) Service Manual: Injector Specifications
Specification
Item
Specification
Coil Resistance (Ω)
1.425 - 1.575 [20°C(68°F)]
...
Kia Niro 2017 (DE HEV) Service Manual: Pre-Charge Relay Description and operation
Description
Built into the Power Relay Assembly (PRA), the Pre-Charge Relay starts to charge
the capacitor of the inverter soon after ignition "ON", then it goes out when the
capacitor has been fully charged.
1. High Voltage Power Terminal (-)
2. Hig ...
