Kia Niro: Hybrid Motor Cooling System / Coolant Repair procedures
| Refilling And Bleeding |
Never remove the cap when the engine is hot. Serious scalding could be caused by hot fluid under high pressure escaping from the reservoir. |

When pouring inverter coolant, be sure to shut the relay box lid to prevent spilling coolant onto electrical parts or painted surfaces. Immediately rinse off any spilt coolant. |

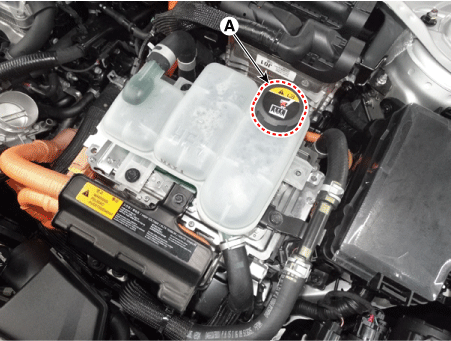
| 1. |
Remove the inverter reservoir cap (A) to help drain the coolant faster.
|
| 2. |
Remove the under cover. (Refer to Engine Mechanical System - "Engine Room Under Cover") |
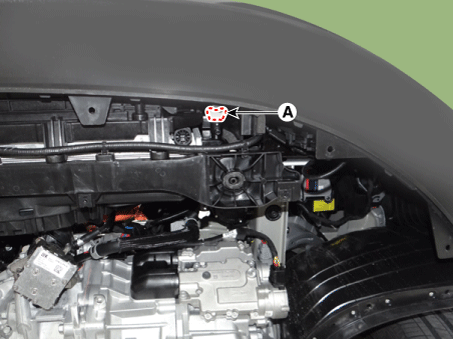
| 3. |
Remove the drain plug (A), allow the coolant to drain out and then reinstall the drain plug.
|
| 4. |
After draining coolant from the reservoir tank, clean the tank. |
| 5. |
Fill the radiator with water through the inverter reservoir cap and tighten the cap.
|

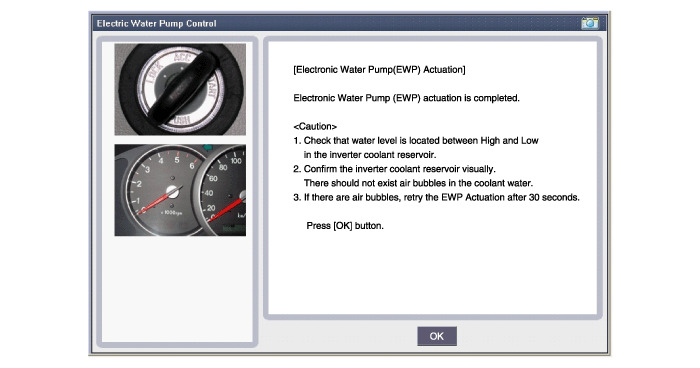
| 6. |
Switch "ON" the ignition and then perform the EWP actuation using KDS/GDS.
|
| 7. |
Repeat steps 1 to 6 until the drained water runs clear. |
| 8. |
Fill the reservoir with coolant. Slowly fill with the fluid mixture of coolant and water (45 - 50%).
|
| 9. |
Perform the EWP actuation using KDS/GDS.
|
| 10. |
While the EWP operates and coolant circulates, refill coolant so that the coolant level is kept between "MAX" and "MIN" levels.
|
| 11. |
Air bleeding procedure of the coolant system is completed when the EWP operating sound gets lower and no more air bubbles are seen from the reservoir. (It would take about 3 - 5 minutes.)
|
| 12. |
After air bleeding, stop the EWP, add coolant to the "MAX" level, and install the reservoir cap. |
 Reservoir Repair procedures
Removal
1.
Remove the under cover.
(Refer to Engine Mechanical System - "Engine Room Under Cover")
2.
Drain the coolant of hybrid mo ...

Other information:
Kia Niro (DE HEV) Owners Manual: Low aspect ratio tire
Low aspect ratio tires, whose aspect ratio is lower than 50, are provided for
sporty looks.
Because the low aspect ratio tires are optimized for handling and braking, it
may be more uncomfortable to ride in and there is more noise compare with normal
tires.
CAUTION
Because the sidewall of t ...
Kia Niro 2017 (DE HEV) Service Manual: Heater Core Repair procedures
Replacement
1.
Disconnect the negative (-) battery terminal.
2.
Remove the heater and blower assembly.
(Refer to Heater -"Heater Unit")
3.
Remove the heater core cover (A) after loosening the mounting screw ...
