Kia Niro: High Voltage Battery System / Case Repair procedures
| Removal |
|

High Voltage Battery Front Cover
| 1. |
Shut off the high voltage circuit. (Refer to Hybrid Control System - “High Voltage Shutoff Procedure”) |
| 2. |
Remove the rear seat cushion. (Refer to Body - "Rear Seat Assembly") |
| 3. |
Remove the rear door scuff trim. (Refer to Body - "Door Scuff Trim") |
| 4. |
Remove the cooling duct. (Refer to High Voltage Battery Cooling System - "Cooling Duct") |
| 5. |
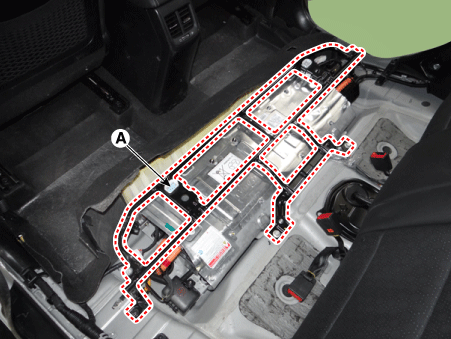
Remove the upper frame (A) after loosening the mounting bolts and nuts.
|
| 6. |
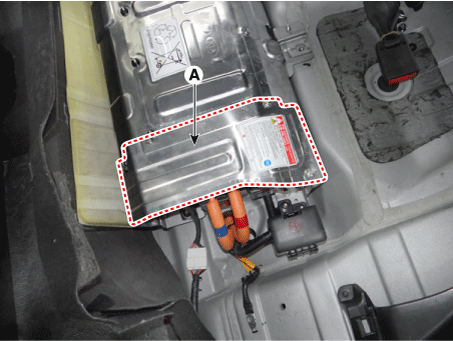
Remove the high voltage battery rear cover (A) after loosening the mounting bolts and nuts.
|
| 7. |
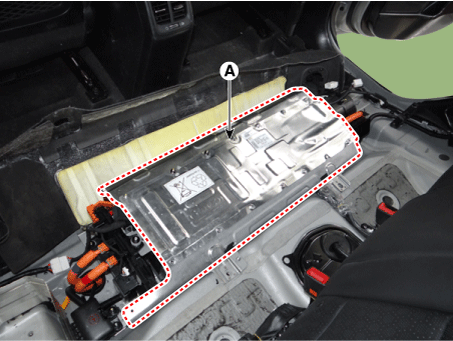
Remove the high voltage battery front cover (A) after loosening the mounting bolts and nuts.
|
High Voltage Battery Rear Cover
| 1. |
Shut off the high voltage circuit. (Refer to Hybrid Control System - “High Voltage Shutoff Procedure”) |
| 2. |
Remove the rear seat cushion. (Refer to Body - "Rear Seat Assembly") |
| 3. |
Remove the rear door scuff trim. (Refer to Body - "Door Scuff Trim") |
| 4. |
Remove the cooling duct. (Refer to High Voltage Battery Cooling System - "Cooling Duct") |
| 5. |
Remove the upper frame (A) after loosening the mounting bolts and nuts.
|
| 6. |
Remove the high voltage battery rear cover (A) after loosening the mounting bolts and nuts.
|
| Installation |
|
| 1. |
Install the case in the reverse order of removal. |
 Power Relay Assembly (PRA) Repair procedures
Removal
•
Be sure to read and follow the “General Safety Information and
Caution” ...

Other information:
Kia Niro 2017 (DE HEV) Service Manual: Fuel Filler Door Release Actuator Repair procedures
Removal
1.
Disconnect the negative (-) battery terminal.
2.
Remove the left luggage side trim.
(Refer to Body - "Luggage Side Trim")
3.
Disconnect the fuel filler door release actuator connector (A).
...
Kia Niro (DE HEV) Owners Manual: Starting the Hybrid System
1.Carry the smart key into the vehicle.
2.Make sure the parking brake is firmly applied.
3.Place the shift lever in the P(Park) position.
In N (neutral) position, you can not start the vehicle.
4.Depress the brake pedal.
5.Press the engine start/stop button or turn the ignition switch to the ON ...
