Kia Niro: Heater / Auto Defogging Actuator Repair procedures
| Inspection |
| 1. |
Switch "OFF" the ignition. |
| 2. |
Disconnect the auto defogging sensor connector. |
| 3. |
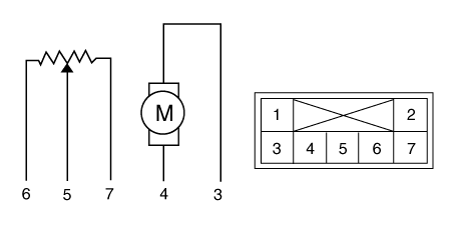
Connect the power (+) terminal to mode actuator connector terminal 3, and ground the negative (-) terminal to terminal 7. Then, inspect that the motor is operated in defrost mode. Reverse the connections to see that it operates in reverse.
|

| 4. |
Connect the auto defogging actuator sensor connector. |
| 5. |
Switch "ON" the ignition. |
| 6. |
Check the voltage between terminals 4 and 5.
Specification
It will feedback the current position of the actuator to controls. |
| 7. |
If the measured voltage does not satisfy the specifications, replace with a genuine auto defogging actuator. |
| 8. |
Replace the auto defogging actuator if it is proved that there is a problem with it. |
| Replacement |
| 1. |
Disconnect the negative (-) battery terminal. |
| 2. |
Remove the glove box housing. (Refer to Body - "Glove Box Housing".) |
| 3. |
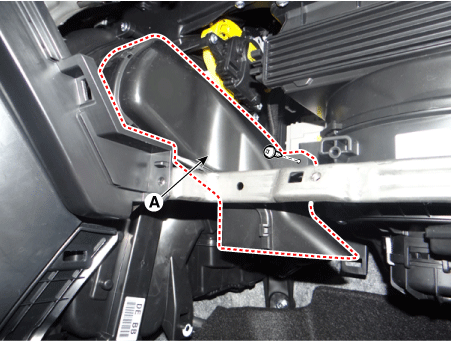
Loosen the mounting screw and remove the passenger seat shower duct (A).
|
| 4. |
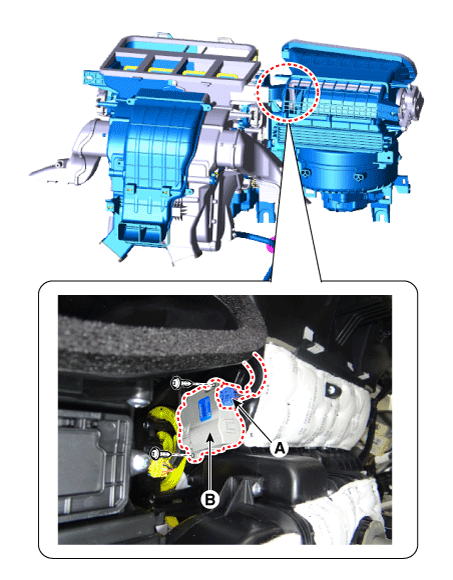
Disconnect the connector and then remove the auto defogging actuator (A) after loosening the screws.
|
| 5. |
Install in the reverse order of removal. |
 Auto Defogging Actuator Description and operation
Description
Installed on the windshield glass, the auto defogging sensor detects humidity
to blow out wind for defogging to improve visibility and driver comfort. The air
conditioner ...

Other information:
Kia Niro (DE HEV) Owners Manual: Emergency towing
■ Front
■ Rear
If towing is necessary, we recommend you to have it done by an authorized Kia
dealer or a commercial tow truck service.
If towing service is not available in an emergency, your vehicle may be temporarily
towed using a cable or chain secured to the emergency towing hook ...
Kia Niro 2017 (DE HEV) Service Manual: Brake Line Repair procedures
Removal
1.
Disconnect the brake fluid level switch connector, and remove the reservoir
cap.
2.
Remove the brake fluid from the master cylinder reservoir with a syringe.
...
