Kia Niro: Power Windows / Power Window Switch Repair procedures
| Inspection |
| [Non-IMS Type] |
Driver Power Window Switch
| 1. |
Disconnect the negative (-) battery terminal. |
| 2. |
Remove the driver front door trim. (Refer to Body - "Front Door Trim") |
| 3. |
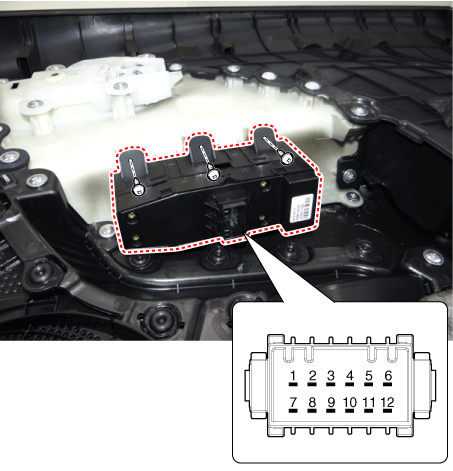
Disconnect the power window switch connector from the door trim.
|

| 4. |
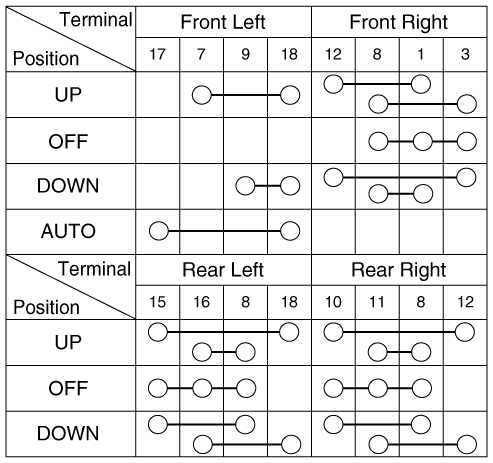
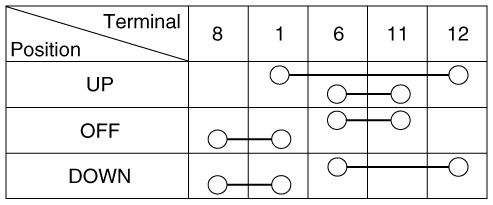
Check for continuity between the terminals in each switch position as shown below. [Power Window Switch Inspection]
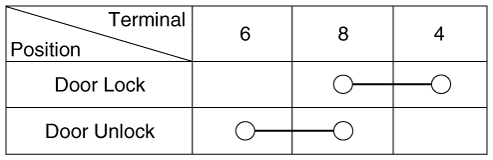
[Power Door Lock Switch Inspection]
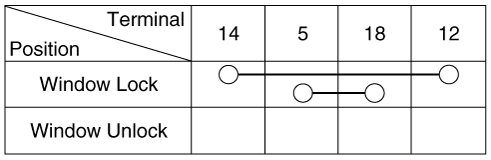
[Power Window Lock Switch Inspection]
|
Assist Power Window Switch
| 1. |
Disconnect the negative (-) battery terminal. |
| 2. |
Remove the assist front door trim. (Refer to Body - "Front Door Trim") |
| 3. |
Disconnect the power window switch connector from the door trim.
|
| 4. |
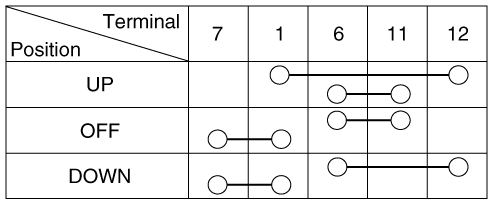
Check for continuity between the terminals in each switch position as shown below. [Power Window Switch Inspection]
[Power Door Lock Switch Inspection]
|

Rear Power Window Switch
| 1. |
Disconnect the negative (-) battery terminal. |
| 2. |
Remove the rear door trim. (Refer to Body - "Rear Door Trim") |
| 3. |
Disconnect the power window switch connector from the door trim.
[Power Window Switch Inspection]
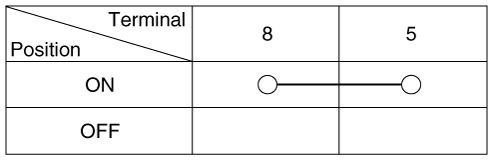
[Rear Seat Heater Switch Inspection]
|
| [IMS Type] |
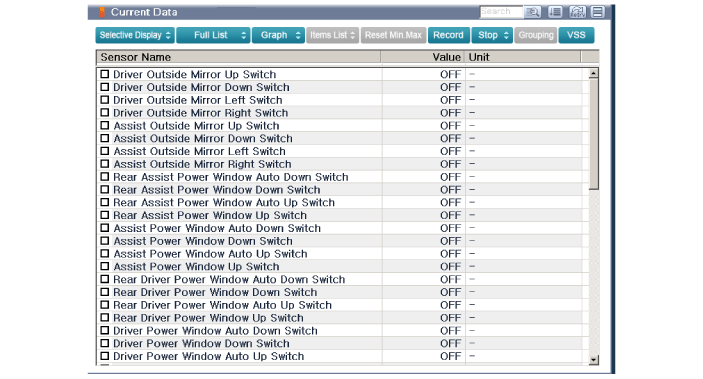
Diagnosis With KDS/GDS
| 1. |
The body electrical system can be quickly diagnosed for failed parts by using vehicle diagnostic system (KDS/GDS). The diagnostic system (KDS/GDS) provides the following information.
|
| 2. |
Select the 'Car model' and the system to be checked in order to check the vehicle with the tester. |
| 3. |
Select the 'Body Control Module (BCM)' to check the driver seat or assist door module (DDM/ADM). |
| 4. |
Select the "Current Data" menu to check the current state of the input/output data. The input/output data for the sensors corresponding to the driver seat or assist door module (DDM/ADM) can be checked.
|
| 5. |
To check the power door lock operation by force, select "Actuation test". |
| Removal |
Driver Power Window Switch
|

| 1. |
Disconnect the negative (-) battery terminal. |
| 2. |
Remove the driver front door trim. (Refer to Body - "Front Door Trim") |
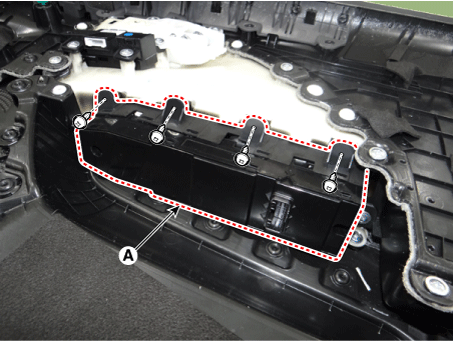
| 3. |
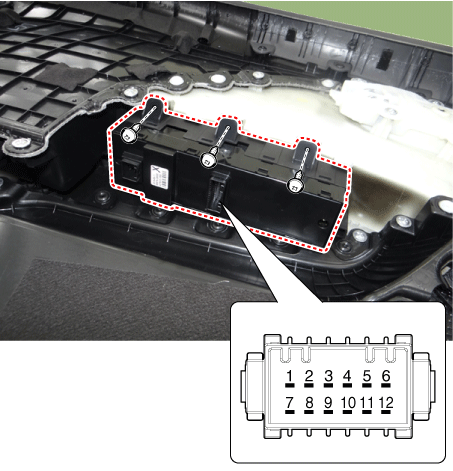
Remove the power window switch assembly (A) after loosening the mounting screws.
|
Assist Power Window Switch
|
| 1. |
Disconnect the negative (-) battery terminal. |
| 2. |
Remove the assist front door trim. (Refer to Body - "Front Door Trim") |
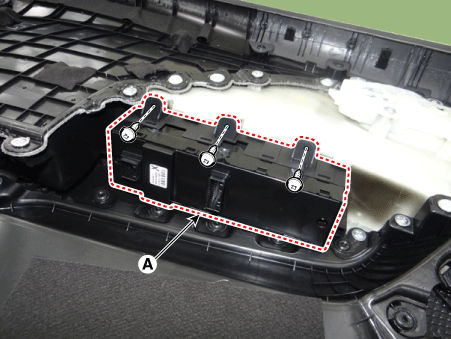
| 3. |
Remove the power window switch assembly (A) after loosening the mounting screws.
|
Rear Power Window Switch
|
| 1. |
Disconnect the negative (-) battery terminal. |
| 2. |
Remove the rear door trim. (Refer to Body - "Rear Door Trim") |
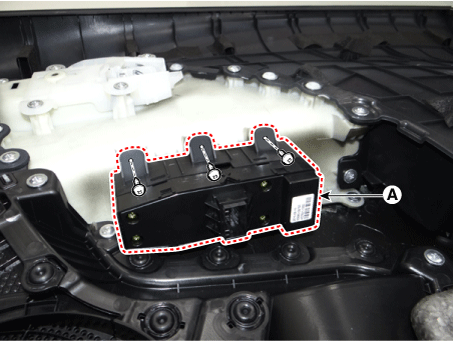
| 3. |
Remove the power window switch assembly (A) after loosening the mounting screws.
|
| Installation |
Driver Power Window Switch
| 1. |
Install the power window switch assembly. |
| 2. |
Install the driver front door trim after connecting the connector. |
| 3. |
Connect the negative (-) battery terminal. |
Assist Power Window Switch
| 1. |
Install the power window switch assembly. |
| 2. |
Install the assist front door trim after connecting the connector. |
| 3. |
Connect the negative (-) battery terminal. |
Rear Power Window Switch
| 1. |
Install the power window switch assembly. |
| 2. |
Install the rear door trim after connecting the connector. |
| 3. |
Connect the negative (-) battery terminal. |
 Power Window Switch Schematic diagrams
Circuit Diagram
Driver Power Window Switch
[Driver Power Window
Switch (Non-IMS Type)]
(Auto Down Power Switch)
(Driver Safety Power
Switch)
(Front Saety Power ...

Other information:
Kia Niro 2017 (DE HEV) Service Manual: Specifications
Specifications
Items
Specifications
Rated voltage
DC 12 V
Operating temperature range
-22 - 176°F (-30 - 80°C)
Rated load
Washer
Washer : 6A (Motor load)
...
Kia Niro (DE HEV) Owners Manual: Master Warning Light
• This warning light informs the driver the following situations
- Blind Spot Detection fail
- Smart Cruise Control fail
- Blind Spot Detection automatic cancelation
- Smart Cruise Control radar fail
- Engine oil shortage and so on
The Master Warning Light illuminates when more than one of ...
