Kia Niro: Air Conditioning System / Photo Sensor Repair procedures
| Inspection |
| 1. |
Switch "ON" the ignition. |
| 2. |
Connect the KDS/GDS. |
| 3. |
Emit intensive light toward the photo sensor using a lamp, and check the change in output voltage. |
| 4. |
The voltage will rise with higher intensive light and fall with lower intensive light.
|
| Replacement |
| 1. |
Disconnect the negative (-) battery terminal. |
| 2. |
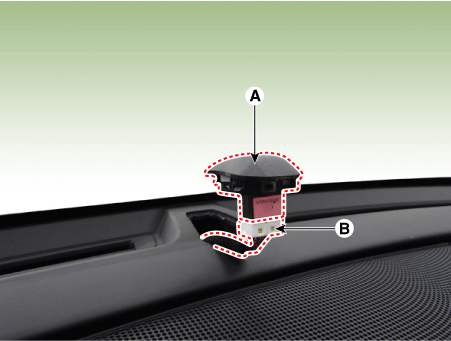
By using a screw driver or a remover, and remove the photo-sensor (A) and remove the connector (B).
|
| 3. |
Install in the reverse order of removal. |
 Photo Sensor Description and operation
Description
The photo sensor is located at the center of the defrost nozzles.
The photo sensor contains a photovoltaic (sensitive to sunlight) diode. The solar
radiation received by ...
 Ambient Temperature Sensor Description and operation
Description
Located at the front of the condenser, the ambient temperature sensor detects
the ambient air temperature. It is a negative type thermistor; resistance will increase
at lo ...
Other information:
Kia Niro 2017 (DE HEV) Service Manual: Repair procedures
Diagnosis With KDS/GDS
1.
BSD system defects can be quickly diagnosed with the KDS/GDS. GDS operates
actuator quickly to monitor, input/output value and self diagnosis.
2.
Connect the cable of KDS/GDS to the data link connector in driver side ...
Kia Niro 2017 (DE HEV) Service Manual: Power Door Lock Module Components and components location
Components
1. Door lock/unlock knob cable
2. Door inside handle cable
3. Door latch assembly
...
