Kia Niro: Engine Control System / Intake Air Temperature Sensor (IATS) Repair procedures
| Inspection |
| 1. |
Switch "OFF" the ignition. |
| 2. |
Disconnect the IATS connector. |
| 3. |
Measure resistance between the IATS terminals 3 and 4. |
| 4. |
Check that the resistance is within the specification.
|
|||||||||||||||||||||||||||||
| Removal |
| 1. |
Switch "OFF" the ignition and disconnect the negative (-) battery terminal. |
| 2. |
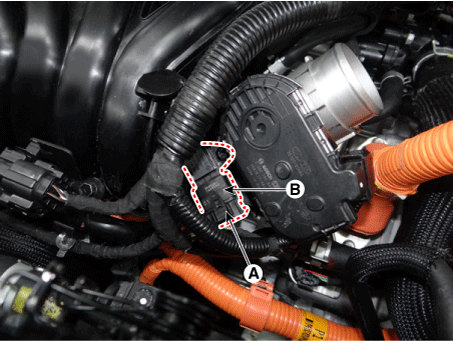
Disconnect the intake air temperature sensor connector (A). |
| 3. |
Remove the sensor (B) after loosening the mounting bolt from the intake manifold.
|
| Installation |
|

| 1. |
Install in the reverse order of removal. |
 Intake Air Temperature Sensor (IATS) Schematic diagrams
Circuit Diagram
Harness Connector
...
 Engine Coolant Temperature Sensor (ECTS) Specifications
Specification
Temperature
Resistance (kΩ)
°C
°F
-40
-40
48.14
-20
...
Other information:
Kia Niro 2017 (DE HEV) Service Manual: Components and components location
Components
1. LDWS ON/OFF switch
2. Instrument cluster
3. LDWS unit (MFC)
? MFC : Multi Function Camera
–
Function : LDWS, HBA, SLIF, AEB, SCC
...
Kia Niro (DE HEV) Owners Manual: Headlight leveling device
To adjust the headlight beam level according to the number of passengers and
loading weight in the luggage area, turn the beam leveling switch.
The higher the number of the switch position, the lower the headlight beam level.
Always keep the headlight beam at the proper leveling position, or ...
