Kia Niro: Dual Clutch Transmission Control System / Clutch Actuator Assembly Repair procedures
| Removal |
| 1. |
Remove the under cover. (Refer to Engine Mechanical System - "Engine Room Under Cover") |
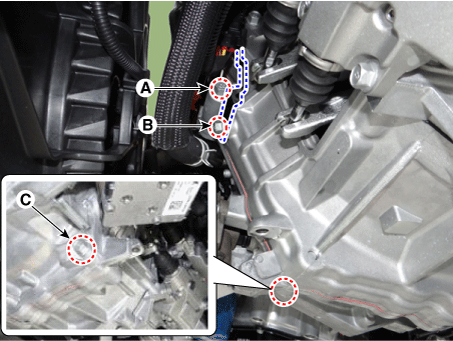
| 2. |
Disconect the clutch actuator connector (A) and then remove the fork cover (B).
|

| 3. |
Install the special service tool (09430-G2100).
|
| 4. |
Fix the clutch fork by rotating a bolt (A) after installing special service tool (09430-G2100).
|

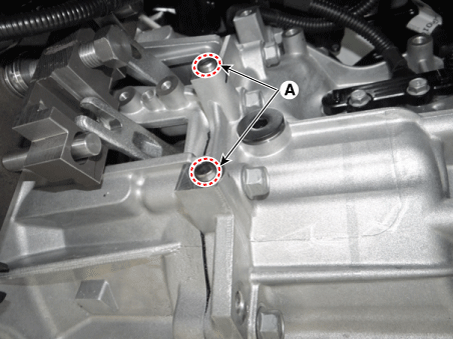
| 5. |
Remove the clutch actuator assembly (A) after loosening the bolts.
|

| Inspection |
| 1. |
Remove the clutch actuator. (Refer to Dual Clutch Transmission Control System - "Clutch Actuator Assembly") |
| 2. |
Install the clutch actuator (A) on special service tool (09430-F0100) and fix the actuator using nuts.
|

| 3. |
Remove clutch actuator motor (A).
|

| 4. |
Insert the special service tool (09430-F0100) into ball screw and rotate counter-clockwise until "clicking" sound is heard.
|


| 5. |
Measure the length (C) from reference plane (A) to the end of rod (B).
|

| Installation |
| 1. |
Install in the reverse order of removal.
|


| Adjustment |
Perform the work procedures for clutch wear reset by referring to the table below.
|

How to rewind clutch wear compensation
| 1. |
Install the faulty clutch actuator (A) on special service tool (09430-F0100) and fix the actuator using nuts.
|
| 2. |
Remove clutch actuator motor (A).
|
| 3. |
Insert the special service tool (09430-F0100) into ball screw and rotate counter-clockwise until "clicking" sound is heard.
|
| 4. |
Measure the each length (C) from reference plane (A) to the end of rod (B).
|
| 5. |
Pull the lever (A) until "click" sound is heard and then measure the each length (B) to check for pull rod length of faulty clutch actuator.
|


| 6. |
Install the new clutch actuator (A) on special tool (09430-F0100) and fix the actuator using nuts.
|
| 7. |
Remove clutch actuator motor (A).
|
| 8. |
Insert the special service tool (09430-F0100) into ball screw and rotate counter-clockwise until "clicking" sound is heard.
|
| 9. |
Remove sealing rubber (A).
|

| 10. |
After inserting the clutch actuator adjusting tool (09430-C1300) into the service hole, rotate it clockwise and rewind the new clutch actuator pull rod to the length measured in step 4.
|


| 11. |
After pulling the lever (A) until "click" sound is heard, measure the length (B) and check that it is the same as the length measured in step 5.
|
| 12. |
Install the sealing rubber (A).
|
| 13. |
Install the clutch actuator motor (A).
|

How to initialize clutch wear compensation
| 1. |
Install the clutch actuator (A) on special service tool (09430-F0100) and fix the actuator using nuts.
|
| 2. |
Remove clutch actuator motor (A).
|
| 3. |
Insert the special service tool (09430-F0100) into ball screw and rotate counter-clockwise until "clicking" sound is heard.
|
| 4. |
Tighten the nut (A) after setting the T plates (B) to 64 mm (2.5197 in). |
| 5. |
Remove the sealing rubber (C).
|

| 6. |
Insert special service tool (09430-C1300) to the sealing rubber hole and then move to the T plates (A) by rotating counter-clockwise.
|


| 7. |
Fix the pull rod to hook (B) and install the sealing rubber (A).
|

| 8. |
Pull the lever (A) until "clicking" sound is heard and then measure the each length (B) again to check for specified length.
|
| 9. |
Install the clutch actuator motor (A).
|
 Clutch Actuator Assembly Schematic diagrams
Schematic Diagrams
...
 Gear Actuator Assembly Components and components location
Component Location
1. Gear actuator assembly
2. Shift motor 2 (Even)
3. Shift motor 1 (Odd)
4. Select solenoid 2 (Even)
5. Select solenoid 1 (Odd) ...
Other information:
Kia Niro 2017 (DE HEV) Service Manual: Components and components location
Components Location
1. Engine Control Module (ECM)
2. Manifold Absolute Pressure Sensor (MAPS)
3. Mass Air Flow Sensor (MAFS)
4. Intake Air Temperature Sensor (IATS)
5. Engine Coolant Temperature Sensor (ECTS) [Water Temperature Control Assembly]
...
Kia Niro 2017 (DE HEV) Service Manual: Climate Control Air Filter Repair procedures
Replacement
1.
Remove the stopper (B) from the glove box (A).
2.
Disconnect the air damper (A) from the glove box (B).
3.
Remove the filter cover (A) by pressing the knob.
4.
...
